With the high cost of astrophotography equipment, it helps to be able to create or modify your own. Fortunately, I have a well-supplied man cave for a garage where I can drill, saw, solder, glue, fabricate, grind, construct and otherwise de-construct just about anything. Here are some of the do-it-yourself projects that I have undertaken for the cause of capturing a nice image.
A stock DSLR takes great pictures and one of the reasons is the infrared cut-off filter that manufacturers place on the sensor. This filters out sources of light that would muck up the image. Unfortunately, it also filters out a lot of the bandwidth of light that we want for astrophotography, mostly in the red range. The solution: replace the filter with one designed for astrophotography. In this sequence of images, I am spending a Sunday afternoon modifying my Canon 350D camera with a Baader UV-IR filter. I was relived when the screen lit up when I turned it on after the operation!


I purchased a SVP mount on Astromart in order to create a travel scope that I could pack in my suitcase (OK, it will take two suitcases). The main problem I had to solve was getting the tripod to breakdown into parts no longer than 26″ (the diagonal space inside the suitcase). This is quite a challenge, considering that the collapsed tripod is 38″ long! Here’s how I solved the problem.
Even if you do not need to cut the legs, this procedure will still enable you to modify the tripod legs for easy disassembly for easier transport.


A Scopebuggy is a marvelous contraption that allows you to roll your scope around, tripod and all. This saves time and back strain. Having no decent place on my property to construct a permanent observatory, I settled for a site at the end of my driveway, affectionately known as the Wurst Observatory. It is in the street, albeit in a cul-de-sac, and requires that I set up my scope each time I have an imaging session. With the necessity of good polar alignment in order to capture long exposure images, I had to devise a way to set up my scope in precisely the same spot and configuration each time. Otherwise, it would take a good 30 minutes each time to align my scope. Here’s what I came up with. First, I manufactured 3 thick metal plates which I mounted in the street after carefully measuring and aligning them with the north polar axis and arranging them so that the leveling bolts on the buggy would fit into them. Next, I beefed up the leveling bolts on the buggy so that they would fit exactly into the metal plates and extend to a pre-set length in order to level the buggy and point it at true north–and be tight enough so that the buggy wouldn’t wiggle. Now that I’ve polar aligned my telescope mount in this configuration, I can just wheel my scope down the driveway and position it over the plates each time I set up and I’m pretty darned close to polar alignment.


 Digital cameras do not like long exposures; astrophotography requires very long exposures. When the “shutter” is open on a digital camera longer than a few seconds, the sensor chip begins to heat up to the point that some of the pixels light up at random, leaving tiny white dots on the image. The longer the exposure, the more “hot pixels.” The higher the ambient temperature, the more “hot pixels.” So, one way to control the problem is to keep the sensor chip as cool as possible. Professional grade CCD cameras designed for astrophotography have built-in cooling mechanisms that keep the chip below freezing.
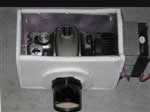
To keep my images from being full of white dots when imaging on a warm south Texas night (or any night in south Texas, for that matter) I built a miniature refrigerator to chill down my camera. For more details, click here for the page I made specifically for this project.
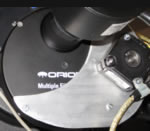 I love this filter wheel that I got from Orion Telescopes. It is made by Atik and holds five 1.25″ filters. It is a manual wheel, which requires you to turn the wheel to the specified filter. This saves you from having to remove your camera to change the filter, with the usual result of messing up your scope’s alignment.
Even with a filter wheel, however, there is still the matter of having to touch your scope to rotate the wheel; it is still easy to bump the scope out of position a bit. Furthermore, it still takes a few minutes to rotate the wheel and re-center the scope. Jupiter does not allow much time to waste, since it rotates so fast that unless the exposures are all made in a couple of minutes, the image will be blurred.
So, I motorized my wheel by outfitting it with a stepper motor and controlling it from a custom program written to interface with the motor via an Arduino. For more info, click here for a page devoted to this project.